I've had these square shelves for what seems like an eternity!
I was brainstorming a color scheme for our new house (that we don't have yet) - I decided on a white/black kitchen with splashes of orange for compliment (now realize when I say splashes - I mean it. Too much orange would make our kitchen feel like halloween). These shelves don't serve much purpose as there isn't a whole lot that you can fix on them - so I thought - why not make them into 'frames'. After browsing Getty Images, I found two photos that worked perfectly. Mod Podge + Exacto Blade = Perfect!
I apologize for the poor picture quality - but more decent photos won't come until we have a house and they are hung!
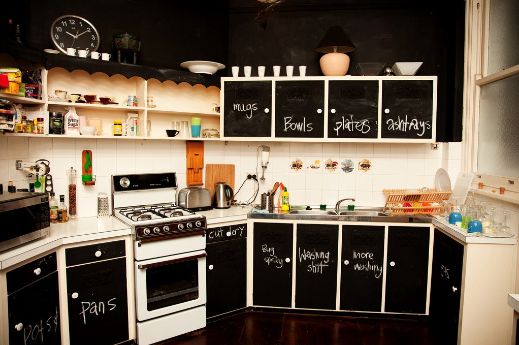
p.s. I envision something along the lines of this Chalkboard Kitchen for my very own! However, due to little fingers - I can't see painting the lower cabinets with chalkboard paint going well!
Thursday, March 11, 2010
Thursday, January 28, 2010
Vitruvian Man - Fingers Crossed
As I was walking through the decor section of T.J. Maxx with my daughter the other day, I came across a Vitruvian Man Collection sculpture. I loved the fingers crossed design and was ecstatic to see that it was only $10.00! I quickly tried to reason with myself that it would serve no purpose and wasn't worth the ten dollars. As I continued to browse the aisles, this same sculpture continued to present itself. Surely taking it as a sign that I was meant to purchase this item - I put it in the cart (at the same time I found myself handing my daughter the 'Coraline' movie).
Once I got home, I read the tag attached which said that the fingers crossed was often used as a gesture for good luck or making a wish. Immediately, Makalah's summertime wishing upon dandelions came to mind. I knew that this sculpture was a way for me to create a lasting memory of my daughter. A memory of the most beautiful, unselfish little girl - who, when making a wish - asks for world peace.
Tuesday, January 26, 2010
Hand Painted Wall Hanging
My latest project came when searching for fun bookshelf ideas. I stumbled across a Hand Painted Wall Hanging at Karen's Whimsy that is so fun and unique! Though I don't know if I re-created her piece in the same manner in which she created hers, I think I did a fairly good job for a first timer with limited supplies.

Tutorial:
- Find an old book that is just collecting dust (if you cherish all your beloved readings - surely a hardcover book can be found at your local thrift store for CHEAP).
- Tear 1-2 pages out from the book. I suggest tearing from two separate areas to eliminate a gap in pages.
- Find the center of the book and pull one page up from left and right (DO NOT tear out - just separate them from the rest of the book). Weigh down either sides of the book with a heavy object, ensuring that the hardcover is flat against your working surface.
- I used Mod Podge - Matte to paint around the sides of the pages in order to seal them together. I used two layers - another will be used later.
- While waiting for the Mod Podge to dry, I cut strips of paper from the pages I tore out (1/2 inch width).
- Acrylic ink would work best for this project, but since I didn't have any on hand - I simply mixed acrylic paint half and half with water. Brush the color mixtures of the front and the back of your strips. The amount of times you wish to paint them is dependent on how prominent you want the color to be. I only used one coat on most of my strips.
- By now, the Mod Podge should be dry.
- Creating an acrylic mixture, once again, but with white. Brush this mix over the top of the reserved paper and along the sides. I placed a piece of computer paper between my reserve paper and the sealed pages to prevent them from possibly sticking during the painting process. (since the pages are wet - they are more susceptible to tearing.) I also taped off the visible portion of the hardcover - but found this to be unnecessary because any paint that bled underneath the tape was easily removable with a baby wipe. For this portion I did two layers along the edges and two across the top of the pages. However, the pages of my book were cream in color - if you're using a book with white pages...only one coat may be needed. Once the paint is dry, center where your first weave will start and where the last one will end. My 'design area' was 5 inches with my strips being 1/2" wide with the same distance between. Depending on the size of the book, this will vary.
- Mark off with a ruler where you will need to cut with an exacto blade. Upon marking cut areas, place a piece of cardboard behind the reserve paper and use and exacto knife to cut your slits.
- Weave each strip of paper through your slits being careful not to tear the slits. It can be tricky, I recommend starting with the weaves closest to the binding.
- Once all your weaves are in place, use a brush and paint color of your choice (I used chocolate brown) to put a small dot in the center of each square.
- When the paint is dry, go over the entire project once again with one coat of Mod Podge.
- I wanted to use picture hangers to display this piece on my wall, but found that I didn't have any. However, I did have a piece of thick cardboard the right size to fit across the back (thanks to a case of Bud Light) and some picture wire. I simply nailed a hole into the left and right upper sides of the cardboard and wrapped some wire through the holes. I then used Gorilla Glue to bind the cardboard to the back of the book (making sure there was cardboard on both sides to help ensure the piece would lie flat). After a few hours of having heavy objects placed on top - it was ready to go!
Introduction
My name is Jessica and I am the mother to two BEAUTIFUL children. My daughter, Makalah, is four years of age - and I have recently been blessed with a son, Aaxyom, who is two months.
After searching through blogs for DIY projects, I quickly realized that I should start an endeavor of my own. So here I am, trying to figure out how the blogging world works! I look forward to this journey!
Wednesday, January 28, 2009
Subscribe to:
Comments (Atom)


